Perfection is a goal to which one can always aspire. We could probably debate the merits of perfection; is anything less acceptable, or when and why perfection should be our objective. Mistakes are inevitable. The real question: what we do once we’ve made the mistakes?
Help is always around us if we ask. And that’s why I’ve always been happy to share lifelines for your knitted work. Perhaps I just hang around people who hold a high bar for themselves. They aim for perfection and making mistakes is not just inefficient, but frustrating. And in knitting, ripping back just opens a world of possibilities for more mistakes. But adding a knitted lifeline makes it easy to rip back before the mistake.
I trawled through all of the videos on YouTube for the best description of how to create a lifeline in your knitting, and Staci from VeryPink wins my vote.
In complex knitting patterns, it wouldn’t hurt to add them as you go. Why wait for a mistake? You can build the protection along the way and it can also serve as a row counter. Raise the lifeline every four or six rows, depending on the pattern repeat.
Last week, while helping at Sit N Knit, Irene asked me about an embroidery project that she was about to attack. Someone had a small (four inches square) embroidery piece. They wanted Irene to add a name to the existing embroidery and then have it framed as a gift. What did I think about this? Did I have any books that discussed this?
Hmmm… I wasn’t sure what type of embroidery it was, but I do know that it wasn’t cross stitch. I guessed that it was probably crewel embroidery, so out came a childhood favorite: Erica Wilson’s The Craft of Crewel Embroidery. A small embroidered name in a stem or split stitch would probably work.
But how to approach this project?
First, I wouldn’t embroider the name onto the original piece. It’s already small; how would you keep your tension? You’d need to attach additional fabric to the original in order to fit in a frame. So why not just appliqué the original embroidery to a nice cotton or linen canvas after embroidering the name on the new fabric? It protects the original work from excess handling and stress. No vintage or antique textile likes stress!
Next: what style of lettering? There are many ways to do this, but I suggest 2 different possibilities: a nice, hand written pencil marking with beautiful script or choosing a font from your word processing program. Choose the size and font that appeals to you and print out a page with the exact writing. Take your embroidery canvas and press a piece of freezer paper to the wrong side. Then, tape the paper with the writing onto a window. Place your canvas on top of the paper and tape it as well (blue painter’s tape works well here). Trace the letters with a sharp HB or a number 2 pencil. If you have a light box, that works wonders, but not every home has one of those!
Take your canvas off the window and you are ready to embroider!
Good luck Irene! Here I come with the book to lend you…. can’t wait to see how this works for you.
Large chunks of last weekend were spent holed up in my winter studio space, working on a signature quilt from my sister’s wedding last summer. With all of the weekend diversions and mild weather this winter, there’s not been too many home retreats for personal quilting. It was sheer bliss, even though I discovered a mistake as I neared the end of the piecing.
Hopefully the quilt will be right and ready for quilting later this month at Laurena’s Longarm Quilting. I love hand quilting. And, as my skills grow, I love using the longarm machines as well! Laurena teaches quilters how to use longarm machines. After the lesson, you are ready to start quilting your own projects, or practice on benefit quilt tops that are in her care. Laurena’s watchful eye and experience are a valuable part of the rental fee. Silly mistakes are prevented, which means your quilt looks better and is finished sooner. If you haven’t tried doing it yourself, it’s something to consider. And if you have no interest, but want those tops done, put them in Laurena’s custom quilts queue. Over the years, I’ve watched her hatch many ugly duckling quilts into beautiful swans. She wants your quilts to look great!
But back to the Signature Sunspots…..
It all started with Kathleen McLaughlin’s Intersections which was on exhibit at the Vermont Quilt Festival, 2010. Very rarely do I purchase a quilt pattern, but Amalia Magaret’s Sunspots is an exception.
Intersections quilt by Kathleen McLaughlin at the Vermont Quilt Festival, 2010
I knew I wanted that pattern. The opportunities to play with color are endless, and Kathleen’s was very inspiring. So when my sister asked me to make a quilt for her wedding with guest signatures, I saw my opportunity!
During the reception, 3″ strips of fabric with permanent, acid-free markers were on the table. After the first toast, I picked up the microphone and asked everyone to sign and/or leave a message that would be used in their quilt. Before things got too wild, I gathered the strips (which I reinforced with freezer paper to create a sturdier writing surface), stuffed them into the bag and back home they went. These strips will be used in the quilt sashing.
My charming brother in law adores all sports, so it seemed sensible to emphasize the circular aspect of the quilt. My sister asked for a blue and brown quilt… pretty neutral. I’m embracing those but adding the bronze, gold and a bit of red to the mix. I’m also throwing in a few novelty fabrics that represent some interests: cats, coffee, bicycles, books. Some of these ended up in the backing, as it was easy to get wild. Actually, as I laid one color option on the floor, my daughter said, “No, Mom, really, no.” After all, they plan to use this quilt on a bed!
Piecing the curves has been quite simple. This pattern is well suited for batiks, as several pieces need to be cut in mirror image and batiks can be used on both sides. I ended up cutting a few pieces backwards, despite knowing this at the beginning. The pattern itself doesn’t discuss the mirror image cutting, so I definitely wouldn’t encourage this as a beginner’s quilt project.
Sashing between strips means you don’t have to worry much about exact points. Not a lot of opportunities for string piecing here, especially in my first attempt at this quilt. Note to anyone who tries this: measure your strip before you sew on your sashing! This way, that lost 0.5″ will be discovered without a lot of unsewing.
Choosing color mixes has been fun but challenging. As I gathered fabrics for this quilt, it was clear that I had two color ideas in mind. I’d like to make another one! Even with the parameters clearly defined for this quilt, I trucked between my unheated studio space and the winter space, searching for more options. In the end, I replaced 6 fabrics from my original layout, and added more dark blue background pieces from my stash.
What a tease, I know. I haven’t taken pictures yet, but will do that in a later post. Off to correct that mistake!
Early in the winter, I deviated to Webs. I was not being devious, nor deviant, really. A friend had mentioned that Rowan’s recently discontinued yarn, “Calmer” was on sale at the Northampton, MA yarn mecca. Staying focused, I crossed that entire store of temptation, quickly identifying the proper warehouse aisle. My favorite colors are rarely the first choice of other knitters, so the leftovers were still very tempting (why doesn’t it ever work like that for shoes?). I chose a bag of kelly green and six skeins of light apple green and managed to escape without falling into a tactile abyss. Then it was back to my normally scheduled road trip. See? I can resist!
Of course, this yarn did not knit up for me in the gauge suggested on the ball band. After trawling Ravelry, I saw that several people used this yarn to make Marnie MacLean‘s Lily sweater from the Twist Collective. Oh, yes, this I could wear. So I immediately downloaded the pattern and started swatching, despite the fact that I wasn’t quite sure how they managed to get the gauge listed with Calmer.
Fortunately, Twist patterns come in a large range of sizes. After practicing the bobble and lace panel along the sides, I realized that my gauge was completely different. I would need to rewrite the pattern. A bit of math and I found I could basically use the instructions for the 2XL instead of the size medium. I just needed to pay attention to the waistline increases and decreases. And off, I went, casting on this sweater in the round from the bottom edge.
My original swatch piece brought two other issues to the forefront:
Pay attention to the pattern! The bobbles travel in a V shape, not parallel lines
Make those bobbles pop!
Paying attention to the pattern is easier said than done. We all make mistakes.
Looking at the swatch, you can also notice that the first few bobbles aren’t nearly as distinct as the last ones. I took a cue from one of the many tips Annie Modesitt shared with people on the Tactile Travel tour in 2010. She has her own method of creating defined bobbles. I just used one part of her toolbox.
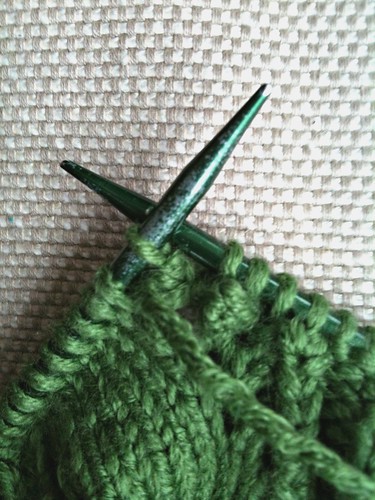
This bobble is created by knitting, purling, knitting, purling, knitting in one stitch. The second, third, fourth and fifth stitches are passed over the first, creating a little ball. The instructions then sent you on your merry way. I, however, moved the yarn to the front of the work and slipped the new bobble back onto the left hand needle.
I then wrapped the yarn underneath the bobble and snugly pulled the yarn to the back of the work. Then I slipped the bobble stitch back to the right hand needle and continued in pattern.
It looks pretty good, but I’m always open to new techniques… anyone else have a way to make bobbles “POP!”?
Once upon a time, delightful dialogue and whimsical pictures inspired me to knit the “Chamonix” skirt from Knitting it Old School. In my stash was a kit for a shadow knit sweater whose gauge never worked, but with a gorgeous supply of Harrisville yarns. A quick gauge swatch revealed a perfect match. Obsessively, I cast on in hopes of wearing the skirt during winter, 2011.
Worked from the top down, the pattern offers alternatives for increasing based on desired skirt flare angles and the wearer’s body structure. I ripped it out after 6 inches, and made the size larger, just in case of those Christmas cookies stuck to the hips. Throughout a snowy January, I happily watched the snowflakes fall outside while the snowflakes grew on the skirt. By early February, it was done and I could hardly wait to try it on!
Chamonix Apres Ski Skirt while blocking
There was no need to look in the mirror after I pulled it on. I became the Abominable Bubble Woman wearing an oversized skirt. See the angle of the skirt as it lays flat? In three dimensions, there was that same angle. Nothing could disguise the fact that my yarn substitution yielded the same stitch gauge but not the same fabric drape. Reblocking did not alleviate any of the issues. I couldn’t wear it, (but I did one day, anyway) the stickiness of the wool made frogging (ripping out) useless, and I couldn’t find anyone willing to take it. Tossed into the pile of stash yarn, it was the equivalent of Aurora sleeping and waiting for the prince to kiss her.
Enter the Sophia Carry All pattern by Amy Butler. My parents sweetly gave me this last summer. Pulling out the pattern pieces, I realized that the Chamonix fair isle pattern might be the perfect match for the handbag. I tossed the skirt with a bunch of towels in the washing machine on hot and shoved it all into the dryer. The top, sides and piping were carefully carved out of the skirt. I chose green faux suede for the purse bottom and gold cotton for the lining.
The pattern calls for folded over, stitched down the middle dividers for interior pockets. That’s not my style: give me a zipper side pocket and two welted pockets to organize the smaller items. It’s a bit more work, but saves time when I’m looking for my phone or keys.
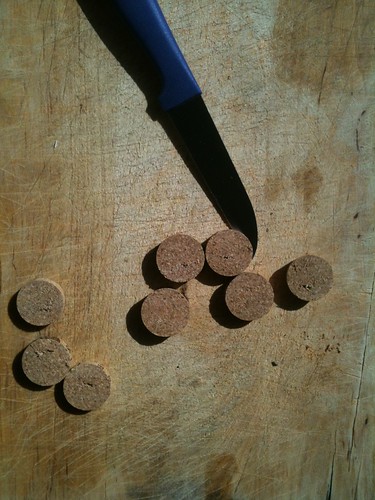
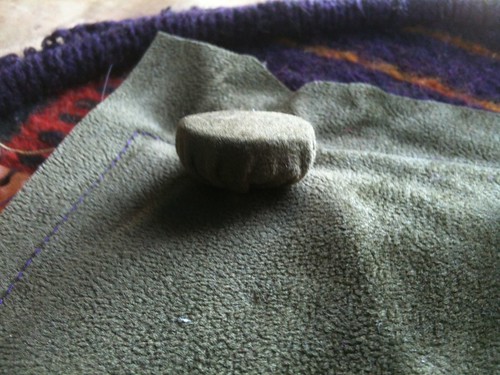
Faux suede is fairly hard working, but I wanted the purse to have feet. The sewing shops in my daily path didn’t carry them, so I sliced a cork from a lovely Pinot Noir into 0.25” circles.
I covered each one with the same faux suede and sewed them to the purse bottom. This is my first try on this and I’m curious to see how it wears over time.
In the end, I made the purse without piping: 4 layers of felted skirt and 2 layers of interfacing were difficult to sew. I thought about cotton piping, but the texture was just not appropriate. Quilter’s template and 2 layers of very heavy nonwoven interfacing supported the purse false bottom.
And then I treated myself to a perfect set of handles by Lantern Moon. Tacking the lining into the bag took more time than I originally anticipated, but I can hardly wait to move into this new hand bag.


 So I immediately downloaded the pattern and started swatching, despite the fact that I wasn’t quite sure how they managed to get the gauge listed with Calmer.
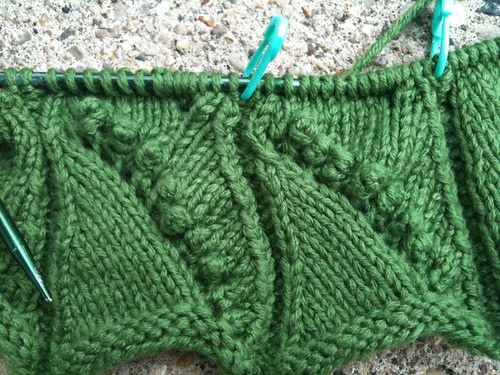
 In my stash was a kit for a shadow knit sweater whose gauge never worked, but with a gorgeous supply of