Aug 25, 2012
When I worked as a seasonal ranger for the National Park Service, August 25 was a great excuse for a party. Dubbed “Christmas in August”, we enjoyed more of each other’s company with a dose of Christmas cooking and perhaps a small present or two. When you live in a transient, isolated small community, hanging out together is a pretty popular activity. Most of us wouldn’t be together for the winter holiday and the summer season was beginning to wind down. While there might be mulled cider at “Christmas in December,” there never were stockings and Saint Nick wasn’t even discussed.

Thanks to the NPS for this aerial view.
Now that you know this little tidbit about me, you can understand why debuting a Christmas stocking pattern in late August isn’t so crazy. It gives you plenty of time for you to knit up a couple for this Christmas.
Earlier this year, I had the opportunity to reproduce Christmas stockings for a Stoneham, MA family. When their girls were small, a neighbor had knit them each a stocking. Now that the girls are women and building their own families, the parents wanted to add a stocking for the son in laws as well. The original stocking was typical sock construction, with a seam up the back and an attached loop to hang from the chimney. I altered the pattern to work the stocking in the round and incorporated the loop into the stocking itself. For those who hate to seam, this is a simple stocking for you!
I’m planning to riff on this pattern for some color work holiday stockings, but click The Warren Christmas Stockings by Alanna Nelson for your own copy of this classic Christmas stocking to knit in worsted weight yarn.
Aug 7, 2012
Throughout this spring, I wondered why on earth I didn’t have more spring sweaters. The Lilly pullover was finally finished in mid June. I even had an opportunity to wear it while working at Sit and Knit one day before it got too hot! As I knit, I realized that my warm weather projects the last few years included:
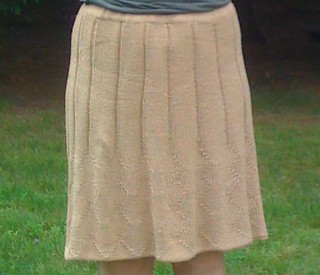
Carmine in Berrocco Touche (this yarn was a great buy at the Boston Knitting Guild‘s yearly auction) was my first skirt, finished in 2009.
In 2010, inspired by those wild and wonderful women at Yarns in the Farms, here’s my “leftover skirt.”
Lily Chin’s crochet dress crowned my spring/summer in 2011, which I wore to my sister’s wedding last year. I am very sorry to say that despite wearing this dress loads, I have yet to properly photograph it. You’ll have to live with this:

Making skirts and dresses has been great and I’ve worn them happily. That doesn’t change the fact that I need some spring sweaters. I retired a lovely cotton zip cardi in 2010. I still miss it. So what did I cast on?
Sasha, a skirt pattern from Louet
Logical.
It was a fantastically wonderfully project for my long haul international flight. I had three skeins of Louet Euroflax in green and a few other skeins in the stash. I decided that the top ruffle was unnecessary enhancement on my short torso, so the idea was a green tier of lace, a yellow tier of lace and finish with blue. Or at least that was the original idea. I’ve finished the green and blue tiers. What do you think?
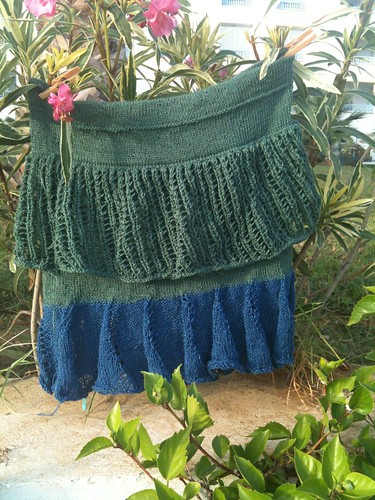
I’m very tempted to pull out the blue ruffle and move it up to the second tier and have the yellow kick out of the bottom. There’s a great temptation to lengthen the skirt as well. Rippit? Or, is it time to cast on a spring cardi…..
Jul 29, 2012

The road to the finished dress was serendipitous!
Set, snip and go! It didn’t take long to cut out the Thai silk evening dress and its lining. I also cut another neckline piece on which I would practice my machine embroidery. Beirut, here we come! With 2 weeks until our departure, I was ready to knock this dress off my to do list. As any good project manager would do, the timeline was prepared:
- After a meeting on Monday night, I would sew the lining and most of the dress body.
- On Tuesday and Wednesday nights, I could work on the machine embroidery and complete the construction.
- Give the dress a few days to hang (silk lining and silk show fabric need time to adjust to the bias cuts and pleasure of its new life) while I was at the Vermont Quilt Festival.
- Hem the dress the following Monday and perhaps even take it to the cleaners for a good pressing.
Or at least, that was the plan.
Jazzed to sew after the meeting on Monday night, I came home and my daughter said, “Mom, I was working on my dress and all of the sudden the sewing machine stopped working. Going through my punch list of machine maintenance, I eventually concluded that the machine’s timing must be off (hmm, did someone tangle some threads and then yank the mangled fabric from the feed dogs… perhaps?).
There was no sewing on Monday night. On Tuesday, I rearranged my day to drop my beloved sewing machine off at Nashua Sewing Center, pleading to have the machine back within a week. Ruthie thought it would be possible.
Keep calm and carry on. You can still finish the dress next week, I told myself. Be flexible. Rearrange your to do list. Think about Vermont Quilt Festival. (You can read my round up on the weekend here.)
I’d almost forgotten that I’d signed up to take a class with Nancy Eha. What a fantastic getaway… sitting in a quiet space, imitating embroidery stitches using beads. Within 45 minutes of being shown the first technique, possibilities for interpreting the machine embroidery in beads on my dress multiplied. Now I know why my sewing machine timing went out! I hadn’t been completely comfortable with the machine embroidery idea. But I could easily convert the largest lozenge motif into beaded embroidery! I’d couch some of the Kreinik Threads and complete the hand of Fatma using gold work techniques.
Serendipity is simply splendid. I bought some Golden Threads Quilting Paper, traced out my new motifs and headed to Bead Gallery on Monday for beads to match my threads. Genvieve looked a bit dazed as I described what I wanted to do. Once I brought over the fabric and my design outline, she quickly suggested some amethyst bugle beads. I also chose some gold seed beads size 7. Then it was a quick trip to Nashua to pick up my sewing machine and check out the Bead Room for other bead possibilities. Now I was ready to go!
First, the practice piece:

Then it was time for the real thing:

Most of US Independence Day was spent creating the amethyst and gold bead lozenges along the neckline. By Friday, I was madly couching gold threads onto the Hand of Fatma. On Saturday, I added the auspicious fish and beads and sewed the center front to the rest of the dress.
My plans for letting the dress hang for a few days? Um, how about 24 hours? I hemmed the dress on Sunday night and rolled it into my suitcase. It could hang in the hotel closet, right? I ended up rehemming the lining before the wedding, as the silk lining stretched more than the Thai silk show fabric. But mission was accomplished, and the dress looked great for the 12 hour wedding extravaganza. What a cute couple! What a great party!
Here’s a few views of the embroidery:

Wishing that I had packed a good pressing cloth! I didn’t have the courage to send the dress to an unknown local cleaning for pressing. But the show went on!
Many thanks to Moussa Al Ahmar at Salon Glow for the fantastic chignon that stayed in place despite hours of dancing outdoors with searing summer temperatures!
Jul 15, 2012
Ah, dear reader… when we last met, I was off to play with my sewing machine and a variety of silk and metallic threads. Skip, hop, jump, and what a cheerful night it was! I took my teal colored Thai silk,
 backed it with Sulky’s Solvy water soluble stabilizer and popped it into an embroidery hoop. I tried circles, straight lines, zig zags, couching, free motion. I had collected Kreinik Japan Thread #7 and some embroidery braid from In Stitches and the Silk Sampler set from Superior Threads. Hmm. The silk sampler set was a lot of fun, and I”m definitely excited about using their Kimono thread as a bobbin thread for couching.
From the night of play, it looked like I would choose a few simple motifs: lozenges inside parallel lines and perhaps a hand of Fatima. Symbols of protection and good tidings sound like auspicious choices for an evening dress. Hopefully this would protect me from the possibilities of a big mess.

From the web site, hamsameaning.com
And so it seemed: a long wrap skirt decorated with metallic embroidery topped with a portrait colored blouse with princess seams. More machine embroidery would follow the princess lines of the dress.
I coasted to bed that night a bit apprehensive about my machine embroidery skills (I’d much rather do this by hand), and ready to read New England’s sources of Kreinik’s Japan Threads.
Then imagination met reality.
My four yards of Thai silk was really 2 pieces of 2 yards, with a very strange discoloration about 6 inches in from the selvedge, not immediately noticeable, but there were also some different tensions in the weaving, leaving striations in the fabric. Careful piecing on the horizon. Hmm. And I remembered the silk velvet dress I made in 2004, thanks to the able pattern drafting skills of Theresa Andrew, custom dressmaker in Milan (after 25 years in the business, she’s moved onto the world of translation). A Vintage Vogue pattern from 1934.
vogue2609 Oops, sorry, you’ll need to click. I scanned and saved it to pdf and not jpeg.
The last time we made this, Theresa and I decided that all of those godets were an invitation to misery for my dress made of bias cut silk velvet. So we turned the dress into a high low hem, creating the flare in each piece of the princess seamed dress. We also incorporated the cape into the center front panel.
Instead of tying at the back, I wanted to create a flowing cap sleeve that attached at the dress back. Pulling out Pellon non woven pattern paper, I traced out the pattern piece from my velvet dress and put it on Ducky, my trusty duck tape torso. Snip, snip and my muslin was cut out. I planned on sewing a set of snaps to the modified cape in order to attach it to the back of the dress. Fortunately, sizing was the same from 8 years ago ;)!

The original pattern shaping is on the left. The modified pattern is on the right.
I lined the dress with teal colored silk habutai. It was time to cut the real thing!
Jun 16, 2012
So what on earth led me into this gold work phase? We could start with my first trip to Tunisia in the 80s, when a friend’s mom dressed me up in traditional wedding clothes of Ksibet El Medouni.

Each town in Tunisia had its own bridal style. If you’re from Hammamet, you’d wear the Hammamet style wedding clothes. If you’re from Ksibet El Medouni, you’d of course wear something like this. There are many layers to their traditional clothing, which is topped with a long woven “malia” (this link gives you an idea of the variation of styles). Two things are common to all Tunisian bridal wear: jewelry and gold work.
This summer, I’m going to a formal wedding in Beirut. They are a lovely couple… so cute to see how excited they are about bringing their lives together. I’d love to wear something that reflects my ties to Tunisia. Goldwork certainly would be lovely.
Having perused all of those lovely books, I decided that whatever I make should definitely be something that I can wear again. This means real gold is out. Never fear, I’ve already started imagining a couple of projects where I’ll use the real thing. I have a dark teal silk mix fabric in my stash. Metallic machine embroidery on a “fouta et blousa” style two pieces ensemble is the thought of the moment.

Ok, I don’t think I’ll get this fancy, but step back and let your imagination wander
So think of me this weekend, making the muslin, playing with stabilizers and putting my sewing machine to work.
Jun 8, 2012
A variety of currents sent me scurrying to the library looking for books on goldwork embroidery. For those of you not familiar with the term, it refers to metallic embroidery of many genres. There’s a rich history of metals in embroidery, and of course, technology makes many of these materials accessible to the everyday embroiderer. My library system had several books with Western historic and contemporary perspectives.

"New Ideas in Goldwork" by Tracy Franklin

"18th Century Embroidery Techniques" by Gail Marsh
I also enjoyed reading Virginia Churchill Bath’s “Embroidery Masterworks: Classic patterns and techniques for contemporary applications.” And of course, even though it’s not gold work, this was irresistible:

Crewel and Surface Embroidery Designs by Trish Burr
Once this was gobbled up, I couldn’t resist and bought a copy of:
I’ve got a couple of projects in mind, and I’ve been trolling the Kreinik, Superior Threads and Berlin Embroidery sites for supplies. Mary Corbett has some interesting posts about her Tudor Rose goldwork project. Oh, dear, I feel a wave of metal embroidery coming on…


