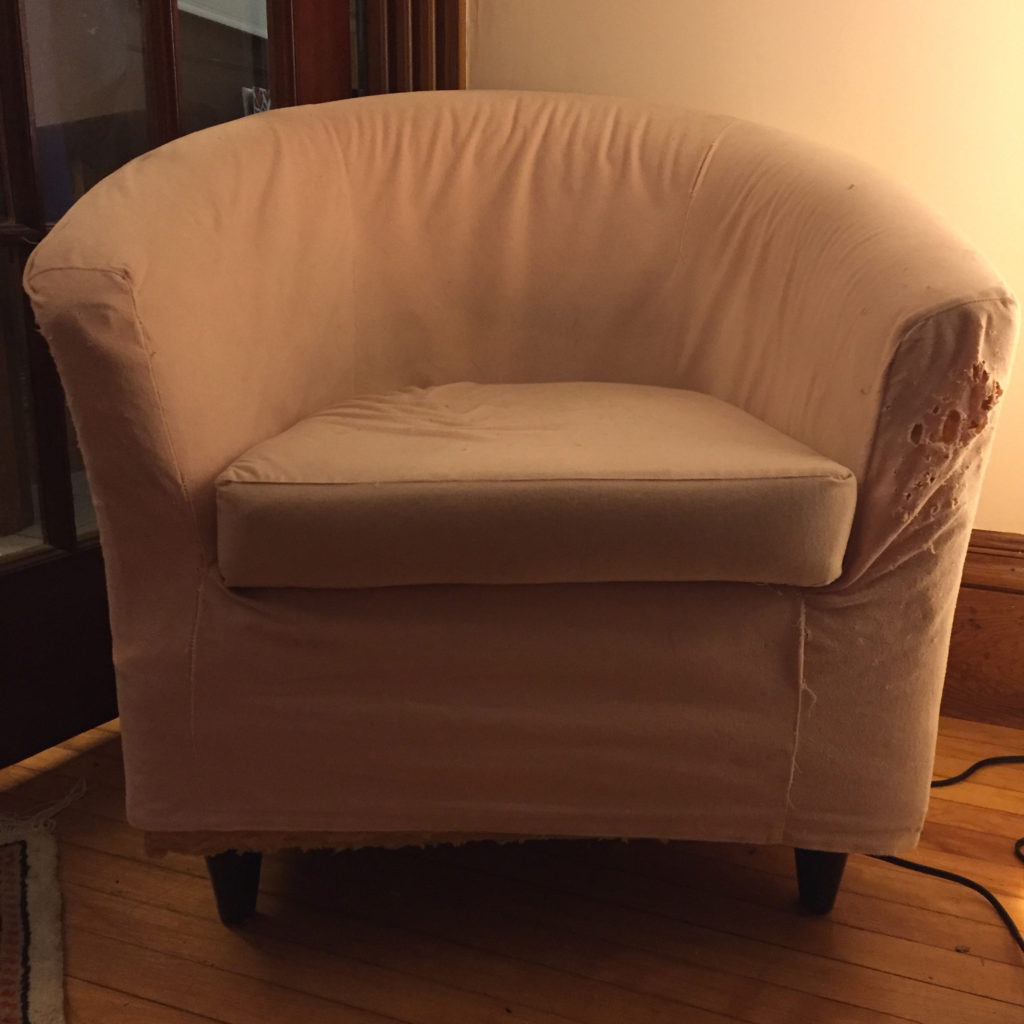
Once upon a time, there were two chairs that looked something like this:
With slipcovers old enough for a drivers’ license, it was time to give these chairs a slip of respect. Fortunately, a trip to New York’s Garment District yielded a fine remnant at a fabulous price. It’s time for that fabric to become new slip covers.
So far, I’ve repaired one chair body and made a muslin cover, which gave me a chance to test my pattern. Whew! That was already a chunk of time. Now it’s just repair this chair, make a second cover and sew the two slip covers.
Just….
Will there be at least one new chair for the New Year? I’m off to my studio.
How many times over the last 15 years have I vowed not to make my own clothes?
While living in Italy, interesting clothing options popped from every shop window. Why do I need to sew with so many fabulous options nearby?
While focusing on art quilts, accepting reluctantly that there are only 24 hours in a day. Why would I neglect my fiber art?
Then reality hits: Italian fashions are often too short for my limbs, too expensive for my budget.
I find fabulous fashion fabrics that I definitely want in my life! So much for my vow not to sew my clothing. Temptation and opportunity lure me back into paper patterns and fitting sessions. So the zig zag continues. I enjoy sewing my own clothes.
Last winter, I vowed to update my wardrobe with clothing purchases. Shuffling through Boston’s dressing rooms yielded more skinny jeans (yawn!) that stuck to my calves when I stood up. The color palettes suited winter or summer complexions, but not this contrasting persimmon autumn. Really? Can’t I find interesting clothing that fits my lifestyle? What to do?
Summer arrived and favorite duds came out of boxes to save the situation(many of them made by me!). My vow to update my wardrobe pops into my mind as the fall/winter fashions hit the news stands and shop windows. In October, I will buy some new clothes.
During the studio move, all of my wonderful fashion fabric passed through my hands. Scrumptious.
As a young professional, I went to a party a color palette party. This “party” made me feel pretty ancient. Where were the festivities, random uninhibited behavior, general raucousness? There must have been something in the punch, as I left having purchased a style advice session.
I learned not to wear navy blue (whoops, everything in my wardrobe needed replacing). Green, turquoise and purple were fab color options for me… huh. The style advisor also advocated scarves.
That was the limit. Scarves? No way! Only Lucille Ball and old ladies wear scarves.
This advice simmered as I romped Italy for a decade. It began to boil as I set down roots in New England. Chomp, chomp, nom, I eat my words. I wear scarves frequently in almost any color except navy blue.
As I researched a post on an Emilio Pucci exhibit, I watched the Spring Summer 2015 runway show, I loved how the models wore scarves as necklaces…
There’s time this winter to cut gorgeous length of silk into necklace lengths! In the meantime, we’ll need to keep our necks warm with gorgeous textiles in knit and woven shapes of all kinds. Thought I’d share this fun video with you.
I’ve eaten my words. Scarves aren’t just for old ladies any more.
The Melrose Adult Education program list is growing by leaps and bounds this spring! There’s opportunities to learn about painting, acting, business skills, interior design and craft. Yours truly will lead two sessions on basic knitting skills, a lecture on how to make a duct tape mannequin and fair isle (stranded) knitting skills. To register, go the Melrose Adult Education Office for the full schedule and registration forms. Here’s class summaries for the sessions I’m leading:
Basic Knitting Skills: Learn 2 ways to cast on, to knit, to purl, and how to bind off. Understand some of the most common abbreviations in knitting patterns and get ready to work on a basic knitting project! Bring light colored, smooth (no novelty yarns, please) worsted or bulky weight yarn and appropriate size of knitting needle. With your MCAE registration confirmation Sit ‘n Knit Melrose offers 10% discount on your class supplies. 7 – 8:30 p.m. Offered on Mondays April 1 & 8 and May 6 & 13, 2013. COST: $25.00
Make Your Own Duct Tape Mannequin: A dressmaker’s mannequin is a helpful tool for sewists, knitters and crocheters. Ideally, it fits your body and your pocketbook! For many hobby garment makers, a duct tape mannequin is the perfect solution. This power point presentation and demonstration helps you and a couple of friends create your own duct tape mannequins. Handouts will help remind you of the steps when you try this at home. Monday, April 22, 2013 Time: 7:00 – 8:30, COST: $10.00
Fair Isle Knitting: Knitting with more than one color at a time creates classic or contemporary accents in your projects. Learn Fair Isle (also known as stranded) knitting techniques using English and Continental methods and read charts. Bright 3 contrasting colors of worsted weight yarns and appropriate sized knitting needles (if you’re comfortable working with double pointed or the “Magic Loop” circular knitting, fantastic! If not, you can learn with straight needles (Monday, April 29, 2013) Time: 7:00 – 8:30 p.m. COST: $25.00
All classes are held at the Milano Senior Center in Melrose, 201 West Foster St. I hear that you’ll soon be able to register online, and I’ll keep you updated.
Set, snip and go! It didn’t take long to cut out the Thai silk evening dress and its lining. I also cut another neckline piece on which I would practice my machine embroidery. Beirut, here we come! With 2 weeks until our departure, I was ready to knock this dress off my to do list. As any good project manager would do, the timeline was prepared:
After a meeting on Monday night, I would sew the lining and most of the dress body.
On Tuesday and Wednesday nights, I could work on the machine embroidery and complete the construction.
Give the dress a few days to hang (silk lining and silk show fabric need time to adjust to the bias cuts and pleasure of its new life) while I was at the Vermont Quilt Festival.
Hem the dress the following Monday and perhaps even take it to the cleaners for a good pressing.
Or at least, that was the plan.
Jazzed to sew after the meeting on Monday night, I came home and my daughter said, “Mom, I was working on my dress and all of the sudden the sewing machine stopped working. Going through my punch list of machine maintenance, I eventually concluded that the machine’s timing must be off (hmm, did someone tangle some threads and then yank the mangled fabric from the feed dogs… perhaps?).
There was no sewing on Monday night. On Tuesday, I rearranged my day to drop my beloved sewing machine off at Nashua Sewing Center, pleading to have the machine back within a week. Ruthie thought it would be possible.
Keep calm and carry on. You can still finish the dress next week, I told myself. Be flexible. Rearrange your to do list. Think about Vermont Quilt Festival. (You can read my round up on the weekend here.)
I’d almost forgotten that I’d signed up to take a class with Nancy Eha. What a fantastic getaway… sitting in a quiet space, imitating embroidery stitches using beads. Within 45 minutes of being shown the first technique, possibilities for interpreting the machine embroidery in beads on my dress multiplied. Now I know why my sewing machine timing went out! I hadn’t been completely comfortable with the machine embroidery idea. But I could easily convert the largest lozenge motif into beaded embroidery! I’d couch some of the Kreinik Threads and complete the hand of Fatma using gold work techniques.
Serendipity is simply splendid. I bought some Golden Threads Quilting Paper, traced out my new motifs and headed to Bead Gallery on Monday for beads to match my threads. Genvieve looked a bit dazed as I described what I wanted to do. Once I brought over the fabric and my design outline, she quickly suggested some amethyst bugle beads. I also chose some gold seed beads size 7. Then it was a quick trip to Nashua to pick up my sewing machine and check out the Bead Room for other bead possibilities. Now I was ready to go!
First, the practice piece:
Then it was time for the real thing:
Most of US Independence Day was spent creating the amethyst and gold bead lozenges along the neckline. By Friday, I was madly couching gold threads onto the Hand of Fatma. On Saturday, I added the auspicious fish and beads and sewed the center front to the rest of the dress.
My plans for letting the dress hang for a few days? Um, how about 24 hours? I hemmed the dress on Sunday night and rolled it into my suitcase. It could hang in the hotel closet, right? I ended up rehemming the lining before the wedding, as the silk lining stretched more than the Thai silk show fabric. But mission was accomplished, and the dress looked great for the 12 hour wedding extravaganza. What a cute couple! What a great party!
Here’s a few views of the embroidery:
Wishing that I had packed a good pressing cloth! I didn’t have the courage to send the dress to an unknown local cleaning for pressing. But the show went on!
Many thanks to Moussa Al Ahmar at Salon Glow for the fantastic chignon that stayed in place despite hours of dancing outdoors with searing summer temperatures!
Ah, dear reader… when we last met, I was off to play with my sewing machine and a variety of silk and metallic threads. Skip, hop, jump, and what a cheerful night it was! I took my teal colored Thai silk,
backed it with Sulky’s Solvy water soluble stabilizer and popped it into an embroidery hoop. I tried circles, straight lines, zig zags, couching, free motion. I had collected Kreinik Japan Thread #7 and some embroidery braid from In Stitches and the Silk Sampler set from Superior Threads. Hmm. The silk sampler set was a lot of fun, and I”m definitely excited about using their Kimono thread as a bobbin thread for couching.
From the night of play, it looked like I would choose a few simple motifs: lozenges inside parallel lines and perhaps a hand of Fatima. Symbols of protection and good tidings sound like auspicious choices for an evening dress. Hopefully this would protect me from the possibilities of a big mess.
From the web site, hamsameaning.com
And so it seemed: a long wrap skirt decorated with metallic embroidery topped with a portrait colored blouse with princess seams. More machine embroidery would follow the princess lines of the dress.
I coasted to bed that night a bit apprehensive about my machine embroidery skills (I’d much rather do this by hand), and ready to read New England’s sources of Kreinik’s Japan Threads.
Then imagination met reality.
My four yards of Thai silk was really 2 pieces of 2 yards, with a very strange discoloration about 6 inches in from the selvedge, not immediately noticeable, but there were also some different tensions in the weaving, leaving striations in the fabric. Careful piecing on the horizon. Hmm. And I remembered the silk velvet dress I made in 2004, thanks to the able pattern drafting skills of Theresa Andrew, custom dressmaker in Milan (after 25 years in the business, she’s moved onto the world of translation). A Vintage Vogue pattern from 1934.
vogue2609 Oops, sorry, you’ll need to click. I scanned and saved it to pdf and not jpeg.
The last time we made this, Theresa and I decided that all of those godets were an invitation to misery for my dress made of bias cut silk velvet. So we turned the dress into a high low hem, creating the flare in each piece of the princess seamed dress. We also incorporated the cape into the center front panel.
Instead of tying at the back, I wanted to create a flowing cap sleeve that attached at the dress back. Pulling out Pellon non woven pattern paper, I traced out the pattern piece from my velvet dress and put it on Ducky, my trusty duck tape torso. Snip, snip and my muslin was cut out. I planned on sewing a set of snaps to the modified cape in order to attach it to the back of the dress. Fortunately, sizing was the same from 8 years ago ;)!
The original pattern shaping is on the left. The modified pattern is on the right.
I lined the dress with teal colored silk habutai. It was time to cut the real thing!