Large chunks of last weekend were spent holed up in my winter studio space, working on a signature quilt from my sister’s wedding last summer. With all of the weekend diversions and mild weather this winter, there’s not been too many home retreats for personal quilting. It was sheer bliss, even though I discovered a mistake as I neared the end of the piecing.
Hopefully the quilt will be right and ready for quilting later this month at Laurena’s Longarm Quilting. I love hand quilting. And, as my skills grow, I love using the longarm machines as well! Laurena teaches quilters how to use longarm machines. After the lesson, you are ready to start quilting your own projects, or practice on benefit quilt tops that are in her care. Laurena’s watchful eye and experience are a valuable part of the rental fee. Silly mistakes are prevented, which means your quilt looks better and is finished sooner. If you haven’t tried doing it yourself, it’s something to consider. And if you have no interest, but want those tops done, put them in Laurena’s custom quilts queue. Over the years, I’ve watched her hatch many ugly duckling quilts into beautiful swans. She wants your quilts to look great!
But back to the Signature Sunspots…..
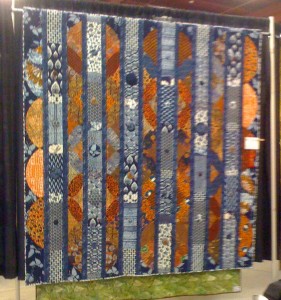
It all started with Kathleen McLaughlin’s Intersections which was on exhibit at the Vermont Quilt Festival, 2010. Very rarely do I purchase a quilt pattern, but Amalia Magaret’s Sunspots is an exception.
I knew I wanted that pattern. The opportunities to play with color are endless, and Kathleen’s was very inspiring. So when my sister asked me to make a quilt for her wedding with guest signatures, I saw my opportunity!
During the reception, 3″ strips of fabric with permanent, acid-free markers were on the table. After the first toast, I picked up the microphone and asked everyone to sign and/or leave a message that would be used in their quilt. Before things got too wild, I gathered the strips (which I reinforced with freezer paper to create a sturdier writing surface), stuffed them into the bag and back home they went. These strips will be used in the quilt sashing.
My charming brother in law adores all sports, so it seemed sensible to emphasize the circular aspect of the quilt. My sister asked for a blue and brown quilt… pretty neutral. I’m embracing those but adding the bronze, gold and a bit of red to the mix. I’m also throwing in a few novelty fabrics that represent some interests: cats, coffee, bicycles, books. Some of these ended up in the backing, as it was easy to get wild. Actually, as I laid one color option on the floor, my daughter said, “No, Mom, really, no.” After all, they plan to use this quilt on a bed!
Piecing the curves has been quite simple. This pattern is well suited for batiks, as several pieces need to be cut in mirror image and batiks can be used on both sides. I ended up cutting a few pieces backwards, despite knowing this at the beginning. The pattern itself doesn’t discuss the mirror image cutting, so I definitely wouldn’t encourage this as a beginner’s quilt project.
Sashing between strips means you don’t have to worry much about exact points. Not a lot of opportunities for string piecing here, especially in my first attempt at this quilt. Note to anyone who tries this: measure your strip before you sew on your sashing! This way, that lost 0.5″ will be discovered without a lot of unsewing.
Choosing color mixes has been fun but challenging. As I gathered fabrics for this quilt, it was clear that I had two color ideas in mind. I’d like to make another one! Even with the parameters clearly defined for this quilt, I trucked between my unheated studio space and the winter space, searching for more options. In the end, I replaced 6 fabrics from my original layout, and added more dark blue background pieces from my stash.
What a tease, I know. I haven’t taken pictures yet, but will do that in a later post. Off to correct that mistake!


